Sporadic freezing/loss of WiFi connection on a Raspberry Pi 3B+

I have two identical Raspberry Pi 3B+ (RPi3B+) running OctoPrint to control my two 3D printers and provide a livestream of the connected webcams when needed. A few months ago I noticed that the "newer" of the two RPIs sporadically lost the WiFi connection after a few minutes or hours. To check if its a a hardware problem I swapped the SD cards between both PIs, but the problem moves with the SD Card, which means its a software problem. First attempts:

  • Update system (dist-upgrade)
  • Changes the location of the Pi to ensure that the WiFi signal is better.
  • A WiFi reconnect script i used before with a Raspberry Zero W.
  • Disabled Power Management with ´sudo iwconfig wlan0 power off´

I have connected a LAN cable, waited until the connection was interrupted and tried various commands to restore the connection. Unfortunately nothing helped. I found some errors in the syslog like mailbox indicates firmware halted and some GitHub issues from RaspberryPi, but no final solution:

wlan freezes in raspberry pi 3B+
PI 3B+ wifi crash, firmware halt and hangs in dongle
brcmfmac: brcmf_sdio_hostmail: mailbox indicates firmware halted

Then I continued to search for differences between the two PIs and found out that the "working Pi" had older drivers 7.45.154 that the "problem Pi", who had 7.45.229. I downgraded the firmware to 7.45.154 (/lib/firmware/brcm - my older Pi had these files) and disabled power management. Now, after some weeks of 8h printing each and enabled webcam no problems. With 7.45.229 and also disabled power management it freezes. The firmware files were the only thing I changed.

Working WiFi Firmware/Driver:

dmesg | grep brcmfmac
Firmware: BCM4345/6 wl0: Feb 27 2018 03:15:32 version 7.45.154 (r684107 CY) FWID 01-4fbe0b04

Final solution (tl;dr):

  1. Disabled Power Management with ´sudo iwconfig wlan0 power off´
  2. Downgrade drivers/firmware (brcm_7.45.154.tar to /lib/firmware/brcm)

Configure local Systemd-resolved DNS Resolver for Company Domains behind VPN

To send queries for the company internal (sub)-domains to the company DNS resolvers behind the VPN, the resolver can be configured with the following commands:

# Configure internal corporate domain name resolvers:
resolvectl dns tun0 192.0.2.53 192.0.2.54

# Only use the internal corporate resolvers for domain names under these:
resolvectl domain tun0 "~example.com"

# Not super nice, but might be needed:
resolvectl dnssec tun0 off

[via]https://www.gabriel.urdhr.fr/2020/03/17/systemd-revolved-dns-configuration-for-vpn/[/via]

Workaround for Raspberry Pi automatic WiFi/WLAN reconnect

My old Raspberry Pi Zero W sometimes had problems restoring the WiFi connection when the AP was rebooted or reprovisioned. I don't know why Rasbian can't do this, but this workaround is my solution: I created a script that continuously tests the connection to the local gateway. If the gateway cannot be reached, the WiFi interface is restarted.

  • Add the following line to /etc/crontab:
*/1    *    * * *    root    /usr/local/bin/wifi_reconnect.sh
#
  • Create bash script /usr/local/bin/wifi_reconnect.sh with this content:
!/bin/bash

#echo "Script runned @ $(date)" >>/var/log/wifi_reconnect 

# The IP for the server you wish to ping (get default getway)
SERVER=$(/sbin/ip route | awk '/default/ { print $3 }')

#echo "> Server: ${SERVER}" >>/var/log/wifi_reconnect 

# Specify wlan interface
WLANINTERFACE=wlan0

#echo "> WLAN Interface: ${WLANINTERFACE}" >>/var/log/wifi_reconnect

# Only send two pings, sending output to /dev/null
ping -I ${WLANINTERFACE} -c2 ${SERVER} >/dev/null 

# If the return code from ping ($?) is not 0 (meaning there was an error)
if [ $? != 0 ]
then
echo "> WiFi doenst work. Restart!" >>/var/log/wifi_reconnect 
# Restart the wireless interface
ip link set wlan0 down
ip link set wlan0 up
#else
#echo "> WiFi works. No restart" >>/var/log/wifi_reconnect
fi 

I added some "echo to file" lines. Remove the # to log what the script does.

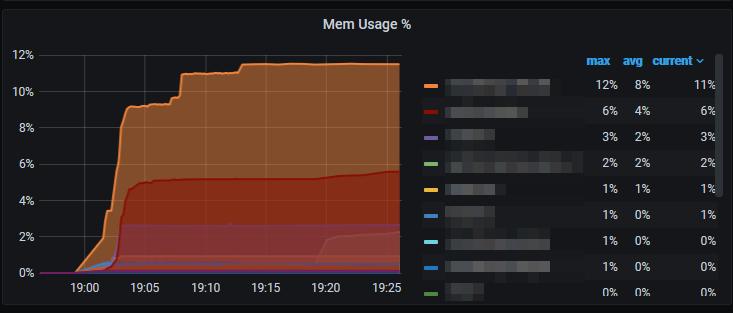
Grafana/Telegraf show 0 bytes memory usage for docker containers

Today i searched for a problem with a docker container. Since there was a problem with the memory usage of the container, I wanted to check it in my Grafana. But unfortunately, the Telegraf plugin showed 0 bytes for each container since months. I founded the solution the the Telegraf GitHub issues. You need to enable memory control groups on Raspberry Pi. To do that, add the following to your /boot/cmdline.txt to enable this metic:

cgroup_enable=memory cgroup_memory=1

And after reboot, it works:

Run iotop tcpdump etc. on Synology DiskStation or RackStation with Synogear

When you need tools like iotop or tcpdump on you Synology DiskStation or RackStation, you doens't need to itall it via ipkg. Synology had a build in way to install the tools.

  • Connect via SSH to your NAS
  • Run sudo synogear install
  • Now you could use the tools from the list below

The package "Diagnosis Tool" are now also visible in the package center. You could also uninstall it from here, but a installation from package center is not possible.

addr2name
arping
bash
cifsiostat
clockdiff
dig
domain_test.sh
file
fix_idmap.sh
free
fuser
gcore
gdb
gdbserver
iftop
iostat
iotop
iperf
iperf3
kill
killall
ldd
log-analyzer.sh
lsof
ltrace
mpstat
name2addr
ncat
ndisc6
nethogs
nfsiostat-sysstat
nmap
nping
nslookup
peekfd
perf-check.py
pgrep
pidof
pidstat
ping
ping6
pkill
pmap
prtstat
ps
pstree
pwdx
rarpd
rdisc
rdisc6
rltraceroute6
rview
rvim
sa1
sa2
sadc
sadf
sar
sid2ugid.sh
slabtop
sockstat
speedtest-cli.py
strace
sysctl
sysstat
tcpdump
tcpdump_wrapper
tcpspray
tcpspray6
tcptraceroute6
telnet
time
tload
top
tracepath
traceroute6
tracert6
uptime
vim
vimdiff
vmstat
w
watch
xxd

Add languages to PHP Docker Container

Recently I have noticed that the output of the following code shows the month in the wrong language (English instead of German):

date_default_timezone_set('Europe/Berlin');
setlocale(LC_ALL, 'de_DE.utf8');
$date_now = date('Y-m-d');
echo strftime('%B %Y', strtotime($date_now));

This can be solved by installing the required language in the docker container. Unfortunately there is a bug which prevents that the languages can be easy activated by locale-gen <lang-code>. So you have to enable them in /etc/locale.gen first and then generate them with locale-gen. This code solves the problem:

FROM php:7-apache

[...]

# install localisation
RUN apt-get update && \
    # locales
    apt-get install -y locales

# enable localisation and generates localisation files
RUN sed -i -e 's/# de_DE ISO-8859-1/de_DE ISO-8859-1/' /etc/locale.gen && \ # to uncomment the lange
    sed -i -e 's/# <your lang code from locale.gen>/<your lang code from locale.gen again>/' /etc/locale.gen && \
    locale-gen

[...]

Or you could install all available languages:

FROM php:7-apache

[...]

# install localisation
RUN apt-get update && \
    # locales
    apt-get install -y locales locales-all

[...]

If you perform a dry run in the container, you must restart Apache for see the changes.

Preparing a Root-Server and install Docker-CE

This is my personal note list for preparing a root server. The list is not complete and may contain errors.

Network setup

  • Install OS as usual or use image from Control Panel

Network setup

  • Set/check fixed ip
  • Set the "Reverse DNS" entry in Control Panel
  • Add local user
    
    usermod -aG sudo <username>```
  • Set hostname
    sudo hostnamectl set-hostname <hostname>
  • Edit the /etc/hosts file
  • Edit the /etc/cloud/cloud.cfg file if exists (preserve_hostname: false to true)
  • Edit the /etc/netplan/50-cloud-init.yaml to add/set fixed IPv4/IPv6 adresses

SSH

  • Add pubkey to ~/.ssh/authorized_keys
  • Disable SSH login with password and permit root login in /etc/ssh/sshd_config file
    PasswordAuthentication no
    PubkeyAuthentication yes
    PermitRootLogin no
  • Restart SSH Daemon
    service sshd restart

VIM

  • VIM Color open ~/.vimrc and add
    colorsheme desert
    syntax on

Enable unattended upgrades

sudo apt-get install unattended-upgrades
sudo dpkg-reconfigure unattended-upgrades

Docker

  • Install docker-ce here
  • Install docker-compose
    sudo apt-get install docker-compose-plugin
  • Install docker-compose here
  • Install docker-compose command completion here
  • add username to docker group (source)
    sudo usermod -aG docker $USER

Logrotate for Docker

  • Create Logrotate config file for Docker containers under /etc/logrotate.d/docker-container with the following content:
    /var/lib/docker/containers/*/*.log {
    rotate 8
    weekly
    compress
    missingok
    delaycompress
    copytruncate
    }
  • Test it with: logrotate -fv /etc/logrotate.d/docker-container

Docker Compose aliases

  • Create or append to ~/.bash_aliases:
    alias dc='docker compose'
    alias dcl='docker compose logs -f --tail=200'
    alias dce='docker compose exec'
    alias dcb='docker compose up --build -d'
    alias dcu='docker compose up -d'
    alias dcul='docker compose up -d && docker-compose logs -f --tail=50'
    alias dcd='docker compose down --remove-orphans'
    alias dcdu='docker compose down --remove-orphans && docker compose up -d'
    alias dcdul='docker compose down --remove-orphans && docker compose up -d && docker compose logs -f --tail=50' 
    alias dcdb='docker compose down --remove-orphans && docker compose up --build -d'
    alias dcdbl='docker compose down --remove-orphans && docker compose up --build -d && docker compose logs -f --tail=50'

Docker after dist upgrade

  • Update key
    curl -fsSL https://download.docker.com/linux/ubuntu/gpg | sudo gpg --dearmor -o /etc/apt/keyrings/docker.gpg
  • Re-enable repo
    
    "deb [arch=$(dpkg --print-architecture) signed-by=/etc/apt/keyrings/docker.gpg] https://download.docker.com/linux/ubuntu \
    $(lsb_release -cs) stable" | sudo tee /etc/apt/sources.list.d/docker.list > /dev/null```
  • update the package database with the Docker packages from the newly added repo:
    sudo apt-get update
  • Make sure you are install from the Docker repo instead of the default Ubuntu repo:
    apt-cache policy docker-ce
  • upgrade packes
    sudo apt-get install docker-ce docker-ce-cli containerd.io
  • reboot

fail2ban

  • Install fail2ban with sudo apt-get install fail2ban
  • Create config file /etc/fail2ban/jail.local and add a jail for the SSH Deamon
    
    [sshd]
    enabled = true
    port = <ssh port>
    filter = sshd
    logpath = /var/log/auth.log
    maxretry = 3

[traefik]
enabled = true
filter = traefik
logpath = /var/lib/docker/containers//-json.log
banaction = docker-action
maxretry = 3
findtime = 900
bantime = 86400

[wplogin]
enabled = true
filter = wplogin
logpath = /var/lib/docker/containers//-json.log
banaction = docker-action
maxretry = 3
findtime = 900
bantime = 86400

[unifi]
enabled = true
filter = unifi
logpath = /var/lib/docker/containers//-json.log
banaction = docker-action
maxretry = 3
bantime = 86400
findtime = 900


* Creat filter for traefik /etc/fail2ban/filter.d/traefik.conf

[Definition]
failregex = ^{"log":"<HOST> - \S+ [.*] \"(GET|POST|HEAD) .+\" 401 .+$
ignoreregex =


* Create filter for wplogin /etc/fail2ban/filter.d/wplogin.conf

[Definition]
failregex = ^{"log":"<HOST> -.POST.wp-login.php.*
ignoreregex =


* Create filter for unifi /etc/fail2ban/filter.d/unifi.conf

[Definition]
failregex = ^{"log":"<HOST> - \S+ [.*] \"POST \/api\/login.+\" 400 .+$


* Create action /etc/fail2ban/action.d/docker-action.conf
Unlike the out-of-the-box action, "actionban" and "actionunban" do not affect the INPUT chain, but the docker FORWARD chain "DOCKER".

[Definition]
actionstart = iptables -N f2b-docker
iptables -A f2b-docker -j RETURN
iptables -I FORWARD -p tcp -j f2b-docker

actionstop = iptables -D FORWARD -p tcp -j f2b-docker
iptables -F f2b-docker
iptables -X f2b-docker

actioncheck = iptables -n -L FORWARD | grep -q 'f2b-docker[ \t]'

actionban = iptables -I f2b-docker -s <ip> -j DROP

actionunban = iptables -D f2b-docker -s <ip> -j DROP


[via]https://www.the-lazy-dev.com/en/install-fail2ban-with-docker/[/via]

How to easily clone a (encrypted hard) disk over network (with dd and netcat)

The task was simple: two computers (notebooks). One - we call it A - with a working operating system (Xubuntu) and a new one - we call it B - without operating system. This is how I proceeded:

  1. Create bootable flash drive with in my case Arch-Linux
  2. In the Arch-Linux boot loader, press [TAB] and add "copytoram" to the boot command to load the squashfs image into ram. I needed this because in this case I only had a flash drive at hand. If you have two, you don't need this.
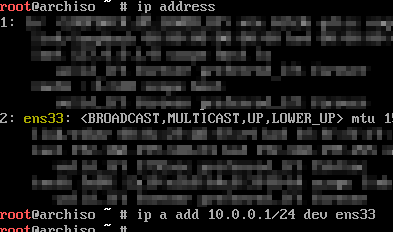
  3. List network devices:
    ip address
  4. Assign a IP adress to computer A with:
    ip address add <machine A ip adress> dev <ethernet device>

  5. To identify source disk, list all block devices with:
    lslbk

  6. Prepare the copy operation (do not execute yet!) with
    dd if=/dev/<source block device> bs=32M status=progress | nc <machine B ip adress> <random port number>

  7. Boot machine B from the same or different flash drive
  8. Assign different IP adress
  9. Identify target device
  10. Prepare the receiving copy operation with
    nc -l -p <same port number as A> | dd of=/dev/<destination block device> bs=32M status=progress

  11. Execute the command on Machine B
  12. Then execute the command on Machine A
  13. Wait until the copying process is completed.
  14. Use at least the Sync command to synchronize corresponding file data in volatile storage and permanent storage
  15. Restart the machine, you are done

How it works/remarks
dd reads the source drive bit by bit into the normal output stream. The output stream is piped to netcat, which sends it over the network to a receiving netcat process (server with -l). Therefore the server must be started first. The server receives the bits and piped them back to dd, which writes them to the target on machine B.

Maybe this is not the best and/or most efficient way, but transfer speed in my case of 75MB/s (poor performance on screenshots is from a setup with two vm's) is in IHMO very good for this simple setup.

Thanks to pmenke for his support.

Windows 10 1903 – BSOD (WDF_VIOLATION)

After updating an iMac Late 2010 to Windows 10 1903 I got a blue screen "WDF_VIOLATION". After checking the minidump, I could see that the MacHALDriver.sys (Macintosh Hardware Application Layer Driver) is involved. After renaming the file (c:\windows\system32\drivers\MacHALDriver.sys) over the network (works because the system crashes after user login) or in safe mode and rebooting, I was able to log back in. Since I don't use an Apple keyboard I can do without the driver.

While researching I found out that other users also have problems with a similar keyboard driver for HP. In this case it is called HpqKbFiltr.sys. Is also responsible for the hotkeys (screen brightness and co.).

[via]https://forums.overclockers.co.uk/threads/macbook-air-win-10-1903-wdf_violation.18855372/[/via]

TIL: Very useful Linux/Unix commands

Here is a list of useful unix commands or code parts. Who does not know it? You have a problem and looking for a solution where you find at stack overflow or similar pages? Here I collect all the commands that I have encountered over time or whose switch I simply can not remember (or want).

  • How do I find all files containing specific text?
    grep -rnw '/path/to/somewhere/' -e 'pattern'
  • How i change the default file permissions (mask that controls file permissions)
    umask
  • Untar (unzip) file/folder
    tar -zxvf archive.tar.gz
  • Tar (zip) file/folders
    tar -cvzf archive.tar.gz file1 file2
  • Copy files via rsync from one host to another
    rsync -avz [USER@]HOST:SOURCE [USER@]HOST:DEST
    rsync -avz [USER@]HOST:SOURCE rsync://[USER@]HOST[:PORT]/DEST
    rsync -avz -e "ssh -p 12345" LOCAL/SOURCE [USER@]HOST:DEST
  • Using rsync with sudo on the destination machine
    1. Find out the path to rsync: which rsync
    2. Edit the /etc/sudoers file: sudo visudo
    3. Add the line <username> ALL=NOPASSWD:<path to rsync>, where username is the login name of the user that rsync will use to log on. That user must be able to use sudo

Then, on the source machine, specify that sudo rsync shall be used:

rsync -avz --rsync-path="sudo rsync" SOURCE [USER@]HOST:DEST
  • Preserve SSH_AUTH_SOCK (Environment Variables) When Using sudo

    sudo --preserve-env=SSH_AUTH_SOCK -s
  • nslookup missing? Install dig

    sudo apt-get install dnsutils
  • find without "Permission denied"

    find / -name 'filename.ext' 2>&1 | grep -v "Permission denied"
  • flush dns cache

    sudo systemd-resolve --flush-caches
  • show open ports

    netstat -tulpn
  • Directory size

    du -sh /var
    du -shc /var/*
    du -h --max-depth=1 /var
    du -sh /var/lib/docker/containers/*/*.log
  • Search multiple PDF files for a "needle"

    pdfgrep -i needle haystack*.pdf
  • Show hidden files with ls

    ls -lar
  • Redirect STDOUT and STDERR to a file

    nice-command > out.txt 2>&1
  • Installs your SSH public key to a remote host

    sh-copy-id 'user@remotehost'
  • A command-line system information tool

    neofetch
  • Show disk usage, folder size, items per folder, find big directorys, ... with ncdu

    ncdu
  • Fancy resource monitor

    btop
  • Display disk activity

    iotop
  • Display network activity

    iftop or iptraf
  • Cleanup Docker

    docker system prune --help
  • Find and repair disk errors on ext (ext2, ext3 and ext4) filesystems

    sudo e2fsck -f </dev/sda2> 
  • Forward TCP/UDP ports with socat

    socat TCP-LISTEN:8080,fork,reuseaddr TCP:homeserver.local:8080
  • Traceroute and ping in one, visual console tool

    mtr <host>